



How to create a Ticketing System for Customer Support

In this post we are going to explain, step by step, how to create a Ticketing System for incident management in Customer Support processes using the Docuo workflow management software.

As I mentioned in the previous post, for any Customer Support department it is very important to have a ticketing system that keeps a record of customer incidents, queries and suggestions, and shows what state each of them is in. This software will make sure you never forget any of the incidents or queries raised by your customers, and will keep the work in order.
A ticketing system is, at heart, a particular case of request and procedure management: every ticket is a case with its record, its state and its owner, and the same ideas apply to any other procedure in the company.
Step 1: Get a Docuo repository
To get started you will need a Docuo repository. If you are already a customer you can use your own; if you are not one yet, you can request a demo.
Once you have your repository, log in to your account using the Windows desktop application and you will be ready for the next steps.
Step 2: Create a Document Category for Support Tickets
The first thing to do is create a category for Support Tickets. To do this, start the desktop application with your administrator account. Now go to the purple tree (categories), press the cog button at the bottom left (Category Manager) and then click “new category”.
You will see the first step of the category wizard, where we define its name and code (Support Ticket):
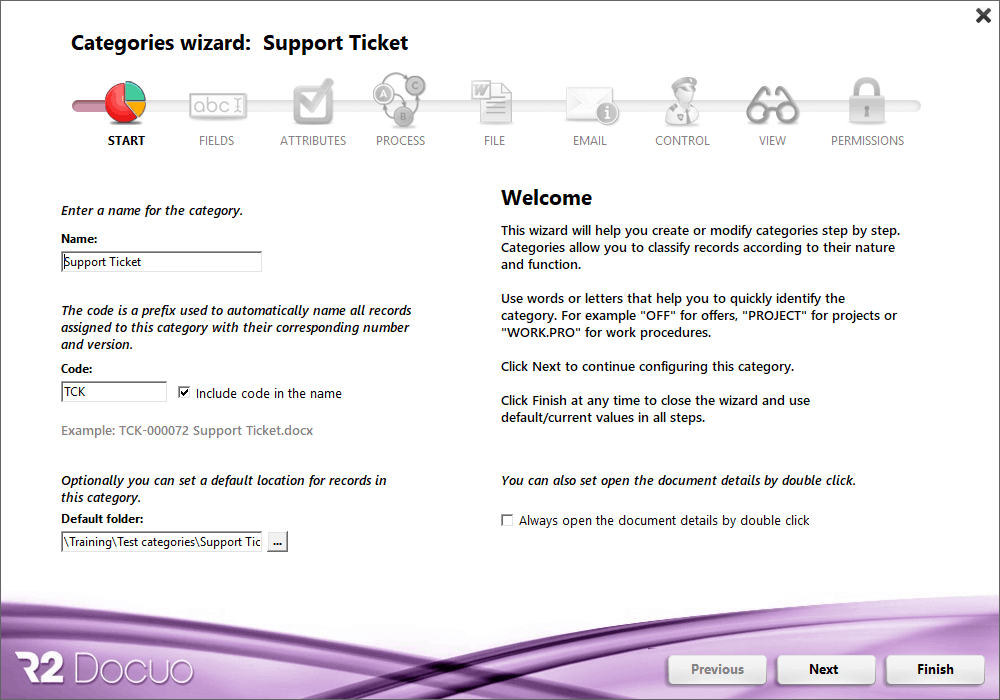
Step 3: Create Data Fields (metadata) to Store the Ticket Information
Then we move on to the “Fields” step and create the fields our ticketing system needs:
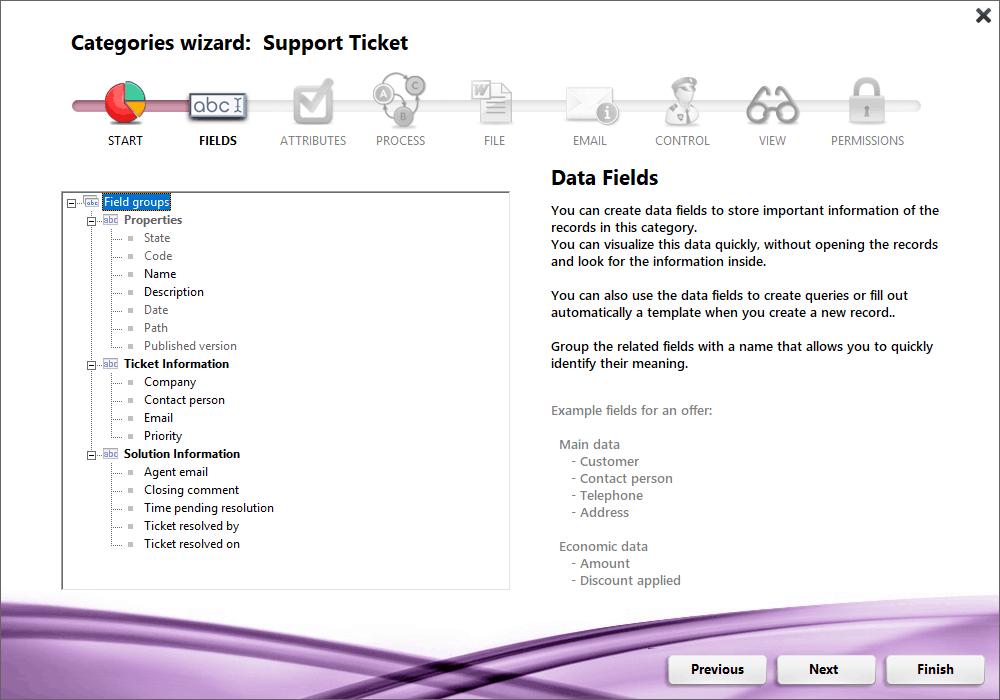
The email field is a text field, but we configure it so that only email addresses can be entered. The Priority field is a drop-down field with the values “Normal” or “High”. The “Closing comment” field is multiline, so that whole paragraphs can be entered. As for the “Time pending resolution” and “Ticket resolved by” fields, these are process information fields. We will come back to them later.
Step 4: Draw a Custom Workflow for your Support Tickets
Now click on the “Process” step and create a simple workflow that every ticket we create will follow:
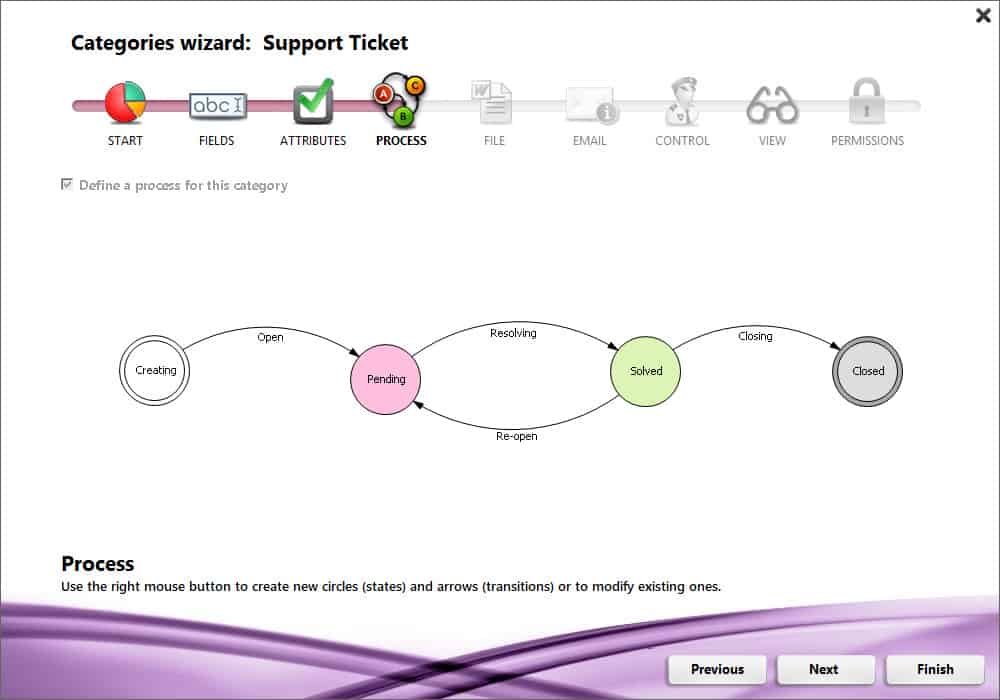
Notice how I have created the transitions (arrows) and the states (circles).
Now we can create the fields that are filled in automatically with the information the process provides (process information fields).
The “Time pending resolution” field shows how long the ticket has spent in the “Pending” state.
The “Ticket resolved on” and “Ticket resolved by” fields are filled in automatically with the date and the user who advanced the ticket to the “Resolved” state.
Step 5: Tell Docuo this Document Category is a “pure” Workflow (it has no main file)
Now we go to the File step and state that our category has no main file.
Step 6: Create Email Templates that will be sent automatically at the right point in the Workflow
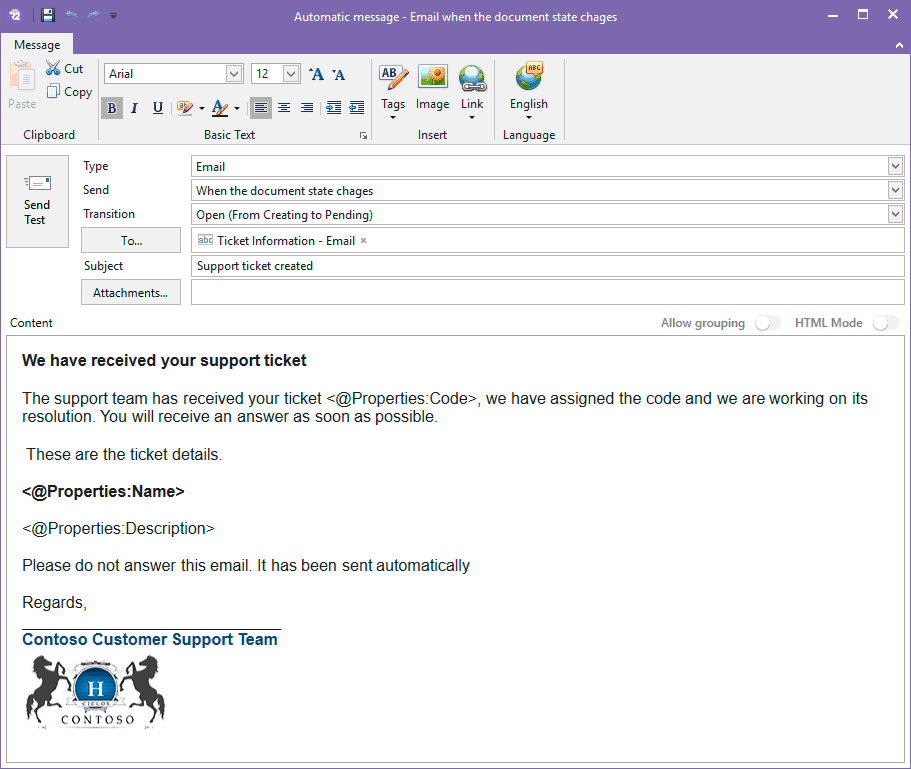
Next we go to the Emails step and create the automatic emails we need to send.
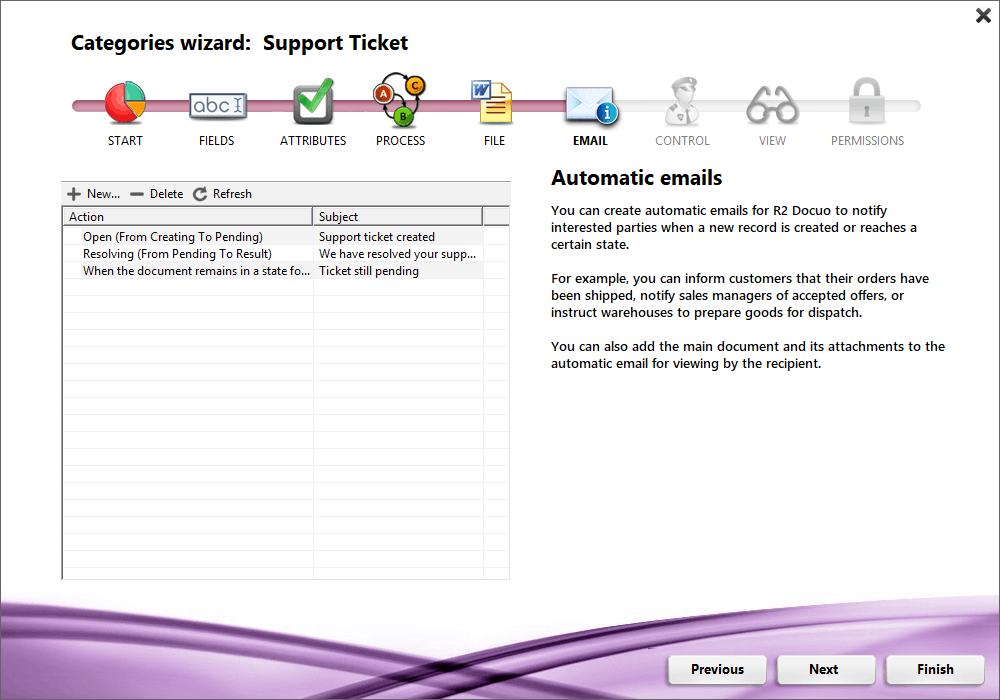
I have created one email that is sent when the ticket is created, another that is sent when it is resolved, and another that alerts us when a ticket has been pending for a long time.
Creating automatic emails in Docuo is very easy. We are creating a template, but in practice it is a lot like writing an email in Microsoft Outlook. This is an example of the screen for creating the first automatic email (the one for ticket creation):
Step 7: It’s ready, start collecting Support Tickets
That’s it. Our ticketing system is ready!
If you need more help creating categories in Docuo, you can consult the user manual.
Once the category has been created, we start creating records as customer requests come in.
For each request, query, incident, suggestion and so on, we create a ticket.
When the fields are filled in, all the information is stored in the ticket window and is accessible with a single click.
Once the ticket has been created, we advance it to the appropriate state.
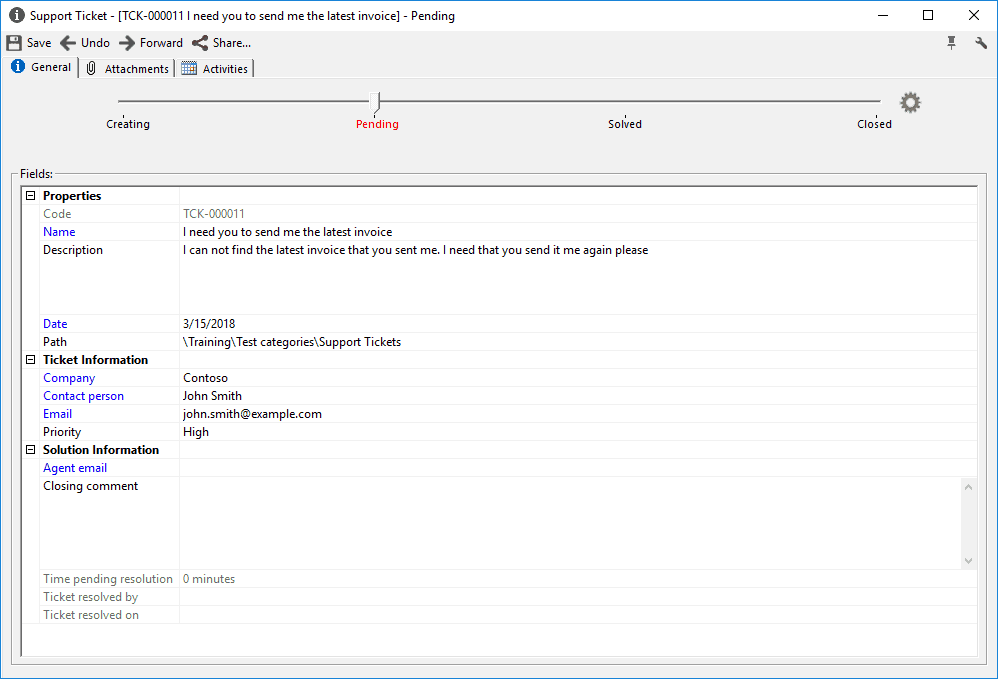
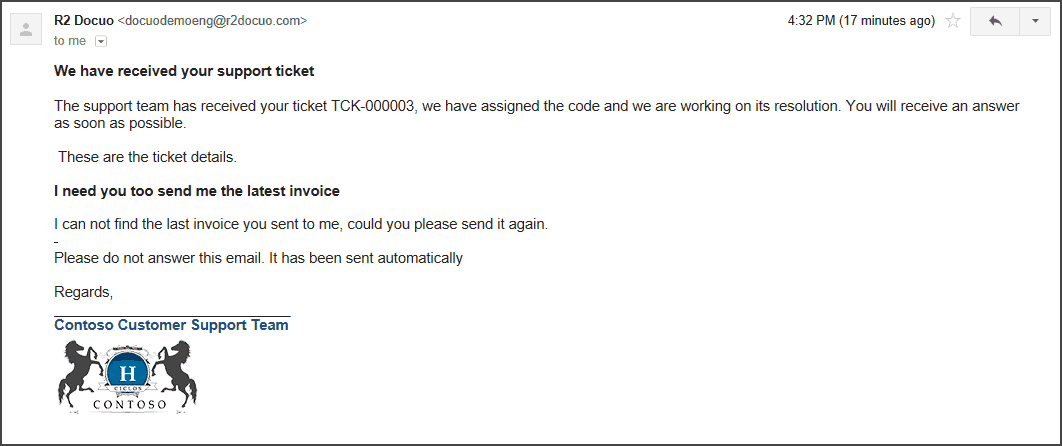
When the ticket advances state, the automatic emails are generated according to how they were configured in the category.
Both the customer and the support team are informed of the ticket being opened and of its resolution.
As new tickets are created or old ones are closed, the ticket count in each state is updated.
At any moment you can know how many tickets are pending resolution and how many have been closed.
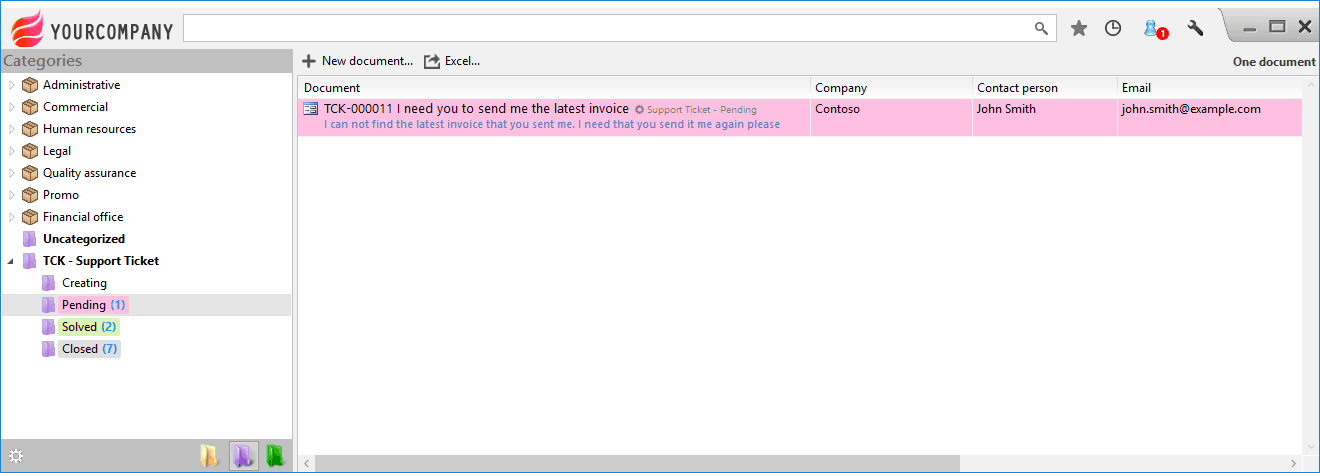
With a category as simple as this you can optimise management times, automate opening and closing responses, control the average resolution time and see the total number of tickets handled.
This process is just one example of the kind of categories you can create to optimise the running of customer support departments. You can create any type of category you consider necessary.
Does it sound difficult? Let’s make it even easier. Here is the “Support Ticket” category for you to download, unzip (it is a ZIP file) and import into your repositories, if you fancy trying out what it would be like to run your company’s ticketing system from Docuo:
Remember that importing is done from the category wizard (purple tree, cog button at the bottom left), by pressing the import option.
Step 8: Next steps: Collect your Users’ Tickets using Web Forms
And there is still the icing on the cake. In this tutorial I have shown you how to create the category to manage tickets, but we still need to create a web form so that any customer can create new support tickets from a browser. We cover that on the Docuo web forms page. Make sure you have followed all the steps here before you start with the forms, and you will see how everything fits together.
I hope you like it!
Conchi Liébana